Hey guys! So I just had my first Xperia phone-rooting experience, after ditching my old Galaxy Ace for an Xperia SL, and I thought I'd share my experience on how to root your Xperia S or SL, and install CWM on it.
The following steps were followed on a Windows Machine, on a "virgin" Xperia SL whilst on the latest
stock 4.1.2 build (6.2.B.1.96).
================================================== ====================
================================================== ====================
INGREDIENTS (what you need):- Flashtool. They say it is recommended to use one version before the latest (i.e. right now the latest is 0.9.13.0, so you should use 0.9.12.0). However, the one that worked for me was 0.9.11.0. You can get the very latest here (official Flashtool website), 0.9.12.0 here (uploaded.net), or you can get the one I used here (mediafire).
- The stock 6.2.B.0.211 kernel.
- DooMLoRD's Easy Rooting Toolkit v18.
- The stock 6.2.B.1.96 kernel.
- DooMLoRD's CWM6 Installer or LEDelete's RecoverX.
- An Xperia S/SL with stock JB 6.2.B.1.96 and USB Debugging Mode enabled.
- A computer.
- Patience.
================================================== ====================
================================================== ====================
DISCLAIMER:
I am not responsible for whatever happens to your phone. Whatever does happen to your phone is your fault, since you decided to be a daredevil and try this out. Therefore I am not to be accused of any damage (temporary or permanent) done to your phone. I will try to be as helpful as possible, should you get lost or break your XS/SL.
STEPS
Ok, now that the warning is over, let's go ahead and root the hell out of that Xperia.
I am assuming
you have already installed Flashtool, and that you know what it does. If you have any doubts about it, you can Google that information or ask me on this thread. Also, this tutorial tells you how to do this on unlocked bootloader. Sony has a nice page on how to unlock it, in case it is. The instructions are
here, including
how to check if your phone has or not an unlocked bootloader. Basically, a locked bootloader means you can't flash custom kernels on your phone (hence not allowing you to flash CWM, for example).
1.
First of all, you need to make sure whether you're on Windows 7, Windows 8, or Windows 8.1. This is very important, because it can save you hours of useless efforts to get your PC to recognize your device. Apparently, both Windows 8 and Windows 8.1 struggle at identifying the right drivers for your phone in order for you to flash anything using Flashtool. If you're on Windows 7, head on to step 3. If you're on a Windows 8/8.1, and you have no trouble with Flashtool (it recognizes your phone right away), then you can go to step 3 as well. If you're on Windows 8/8.1 and Flashtool doesn't recognize your phone, then you might be in trouble; go to step 2.
FOR XSL USERS: it is very likely your phone is not recognized right away, but Flashtool might also show you a list with all the Xperia devices for you to choose your model from. Choose Xperia S, you'll be fine.
2. Windows 8/8.1 introduced an issue with drivers and that's why your Xperia phone might not get recognized
in Flashtool as soon as you plug it in. If this is the case, try this:
2.1. Go to C:\Flashtool (or wherever you have installed it), and run the .exe inside the drivers folder. This should start an installer that will extract the desired drivers onto your system. You must check your phone's drivers along with the Flashboot and Fastboot drivers(the last two in the list).
2.2. If the installation of the drivers finished successfully, then go to step 3. Otherwise, you must "
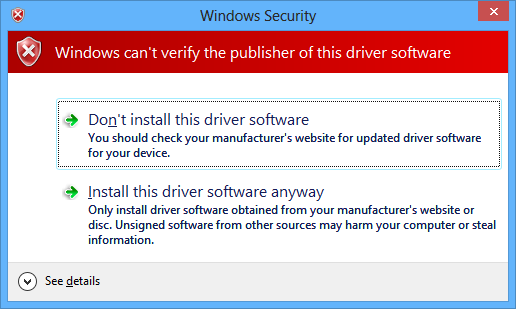
Disable Driver Signature Enforcement" on your Windows 8/8.1 PC. This will let you install unsigned drivers on your computer. Once you're done with Step 9 in that tutorial, try to install the drivers on C:\Flashtool\drivers once again. This time, you should be greeted with this message:
.
Click on "Install this driver software anyway" as many times as prompted. When this driver installation is done, a window will tell you the installation is finished and a list with the drivers that were successfully installed will be shown. All of the selected drivers should have a green check on their left. Should this window still show you red crosses and fail to install the drivers, I'm afraid you might be screwed, unless you can find a Windows 7 PC.
3. So you have no problems with your drivers? Great! This means you can root your phone right away. The method I use is the same explained
here, but I'll explain it with more detail, as the one there assumes you know a lot about flashing. The method DooMLoRD uses is flashing an older kernel first (6.2.B.0.211), because his toolkit doesn't support the latest 6.2.B.1.96 kernel. So, what you need to do is download the files on the "Ingredients" section, and then:
3.1. Open Flashtool. Verify your phone has been detected by Flashtool. Then click on the lightning icon on the top left.
3.2. Select Flashmode, because we're going to select the kernel files to flash.
3.3. Change the source folder to wherever you downloaded the stock 6.2.B.0.211 and 6.2.B.1.96 kernels.
3.4. Make sure the highlighted on is the .211 kernel, and click on flash. This should start the kernel downgrade and restart your phone once it's done.
3.5. When your phone has booted, disconnect your phone and
close Flashtool.
4. Great! Now your phone has the old .211 kernel and can be rooted. Extract DooMLoRD's Easy Toolkit to your C drive .
5. Run the "runme_file" that corresponds to your OS. MAKE SURE YOU RUN THE RIGHT ONE. Since this tutorial is for Windows PCs, the file you should run is the .bat. This will open a console window with a set of instructions. Once you've read them and your device is plugged in (it must be on), press enter. The toolkit will go on from then. Your device will restart as soon as it's done. You can check if it really is rooted by opening the apps drawer and verifying the SuperSU app is there. Remember, you just downgraded your phone's kernel, so some of the old stock apps will come back up. You can uninstall them, but I recommend you do this later on (I'll tell you when).
Now your phone is rooted.
NOTE: The app drawer takes a while to fully load the first time after the root, so give it some time and you should see the SuperSU app. Don't rush things and assume it isn't there. I did that and rooted it twice, thinking it had failed. That was such a waste of time :silly:.
6. Now that your phone is rooted, you can go and flash the newest stock kernel. Follow steps 3.1. to 3.5., but
flash kernel 6.2.B.1.96. Now your phone is rooted and on the latest stock kernel!
CWM INSTALLATION STEPS
7. This should be relatively easy now. Your phone is now rooted, and you will now flash CWM Recovery on your phone. For this, I found a quick installer by DooMLoRD. Just extract it anywhere, run it (cwm-install-en.bat, press Enter 3 times and it will start) while your phone is connected via USB, and you should be just fine. I had to use this method, since I used RecoverX and it did not work. You know CWM was flashed correctly when you shut down your phone, turn it on and your see the LED turns on
BLUE when the Sony logo comes up. When it does, press the Volume Up button and the LED should turn
GREEN for a couple of seconds, then boot into Recovery.
I strongly recommend you do a NAND Backup with your newly installed CWM Recovery.
In order to flash any custom ROM, the instructions are different, but they all follow a pattern. If you're in rooted stock, Factory reset your phone and Wipe the Dalvik cache. If you're in a custom ROM and you're flashing an update to that ROM (say, from Beta 2 to Beta 3), you can do a dirty install on top of it (no wipes), or Wipe Dalvik and normal cache before doing so.
These instructions
may vary between ROMs, however.
If you have any questions, please don't hesitate to post here. I hope this was helpful enough for everyone!
This is all DooMLoRD's work and I'm only saying how you could use it. I do not own any of the downloadable files I have posted here.
DooMLoRD's Dev-Host